Uninstalling an NVIDIA Driver is a common troubleshooting practice for PC users. But if done incorrectly, it can lead to display issues or software conflicts. So, if in case you are uninstalling your NVIDIA drivers, whether because you are upgrading to a new card, switching to a different GPU or attempting to fix display errors, the process needs a systematic approach.
While the process itself is quite straightforward and simple on Windows, but make sure that you don’t leave behind residual files that can create conflicts later on. That’s why in this Guide, I will walk you through the exact steps to uninstall an NVIDIA drivers safely, and will also talk about what to expect, and how to reinstall them properly. So, without wasting any more time, let’s get started.
Things to Keep in Mind Before Uninstalling NVIDIA Drivers
Before you start uninstalling the drivers, take the following precautions to avoid being left with a blank screen or a non-functional system:
- Save any ongoing work before starting the uninstall ation process.
- Make sure that you have access to the internet for reinstalling the drivers later on.
- Download the latest NVIDIA driver in advance so you can install it after uninstalling.
- Your screen resolution can drop temporarily after uninstalling the drivers.
- If you are working on any GPU-based apps or games, expect them to stop working until the reinstallation happens.
- Just to be on the safer side, create a system restore point.
How to Uninstall NVIDIA Drivers on Windows?
For majority of the users using the Windows settings menu is the safest and most direct way to uninstall NVIDIA drivers. Follow the steps mentioned below:
Method 1: Using Control Panel
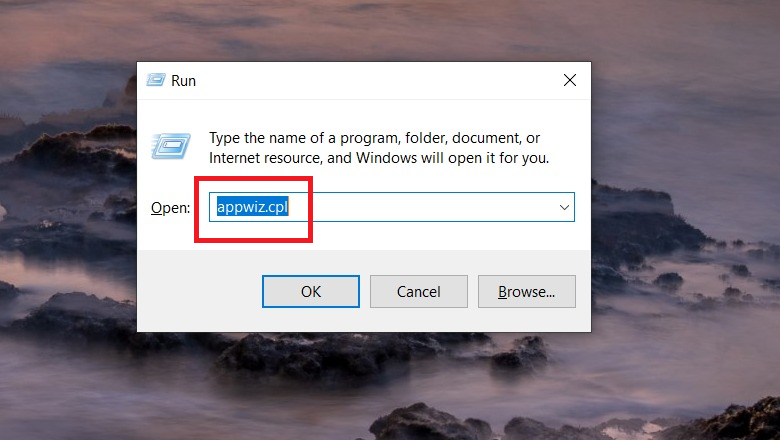
- Press Windows + R, type appwiz.cpl, and press Enter
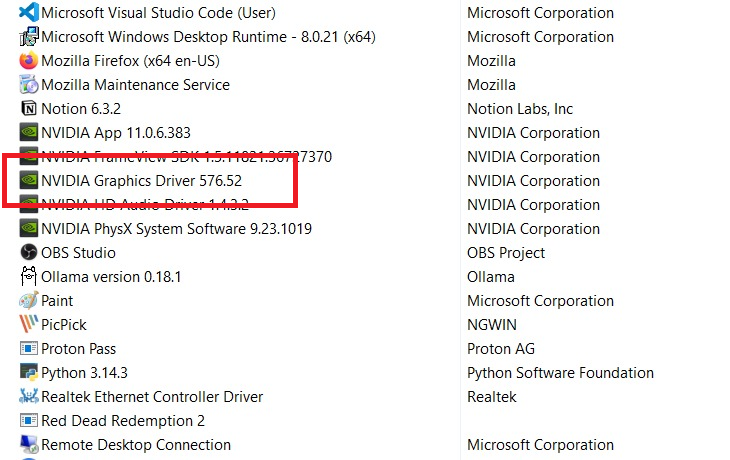
- In the Programs and Features window, locate NVIDIA Graphics Driver
- Right-click on it and select Uninstall/Change
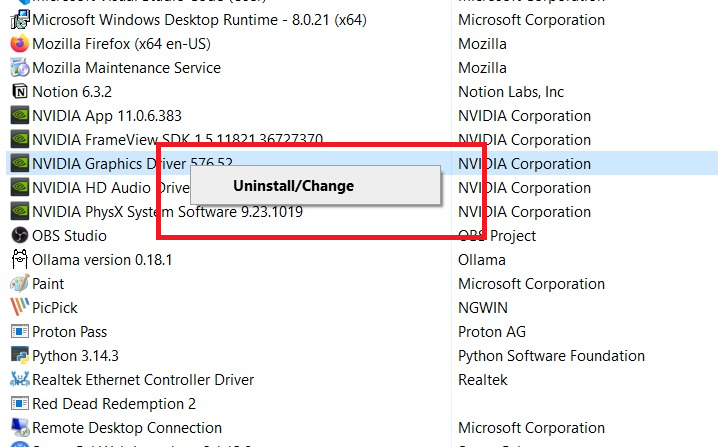
- Follow the on-screen instructions from the NVIDIA uninstaller
- Restart your PC once the process is complete
Method 2: Using Device Manager (Alternative)
- Right-click on the Start Menu and select Device Manager
- Expand Display adapters
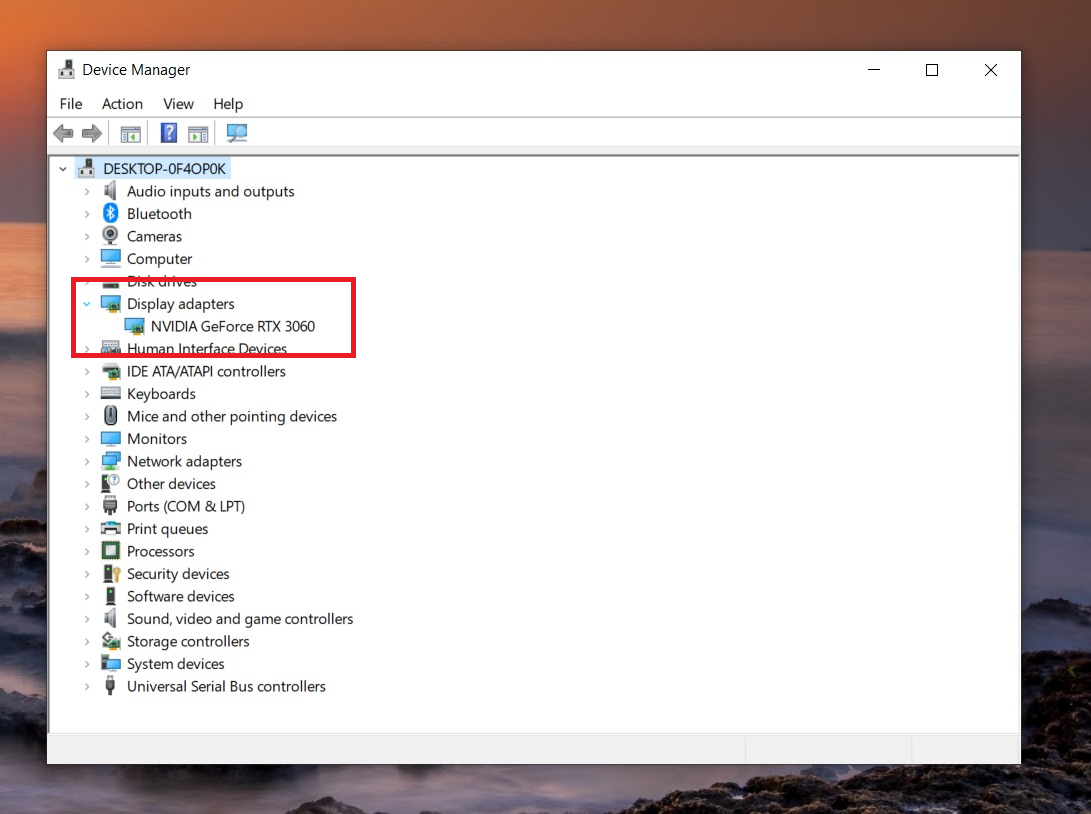
- Right-click on your NVIDIA GPU and select Uninstall device
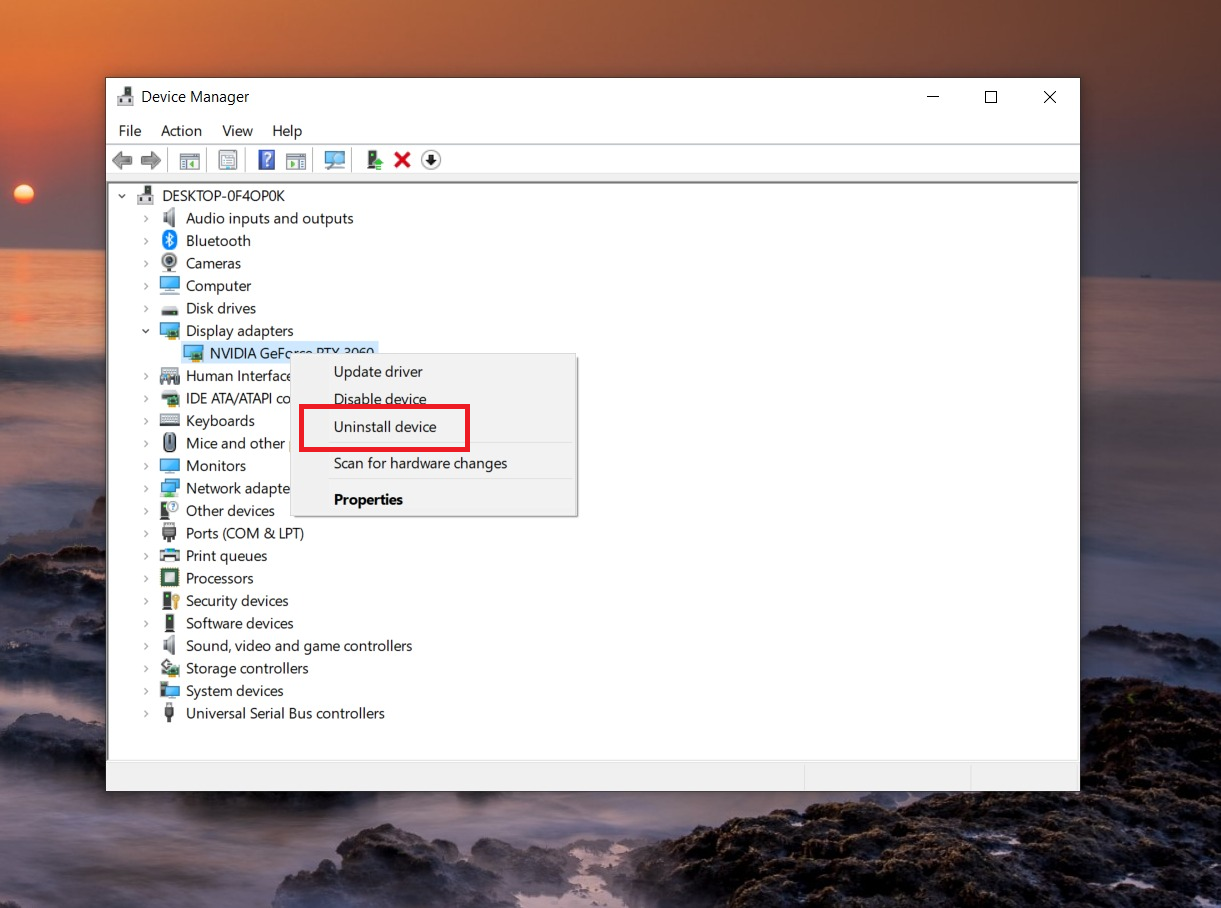
- Check the box for Delete the driver software for this device (if available)
- Click Uninstall and restart your system
This method removes the driver, but may not completely clean leftover files or registry entries.
Method 3: Using Display Driver Uninstaller (DDU) for a Clean Removal
For a complete removal (including leftover files and registry entries), many users prefer using Display Driver Uninstaller (DDU):
- Download DDU from its official website
- Boot your PC into Safe Mode
- Run DDU and select GPU > NVIDIA
- Click on Clean and restart
DDU is recommended only when troubleshooting serious driver issues. And it should always be used in Safe Mode.
What Happens After You Uninstall NVIDIA Drivers?
Once you uninstall NVIDIA drivers, Windows will switch to a default display driver, usually called the Microsoft Basic Display Adapter. This ensures your screen continues to work, but performance will be limited.
You may notice lower screen resolution, lack of GPU acceleration, and reduced performance in games or graphics-intensive applications. Features like NVIDIA Control Panel and advanced display settings will also be unavailable.
In some cases, Windows may automatically attempt to install a basic or older NVIDIA driver through Windows Update. This can happen in the background after a restart.
How to Reinstall NVIDIA Drivers After Uninstalling?
Reinstalling the driver correctly is just as important as uninstalling it.
- Visit the official NVIDIA website
- Go to the Drivers section
- Enter your GPU model and operating system details
- Download the latest recommended driver
- Run the installer
During installation:
- Choose Custom (Advanced) installation
- Select Perform a clean installation
- Proceed with the installation and restart your PC
Alternatively, you can use GeForce Experience to automatically detect and install the correct driver.
Common Problems While Uninstalling NVIDIA Drivers
- “Driver is in Use” Error: This happens when a program is still utilizing the GPU. Restarting in Safe Mode usually bypasses this issue.
- Residual Files: Standard uninstallers often leave behind empty folders or registry entries. If a standard uninstall doesn’t fix your bugs, many enthusiasts use Display Driver Uninstaller (DDU), a third-party tool that wipes all traces in Safe Mode.
- Windows Update Conflicts: Windows may try to automatically install an older, generic NVIDIA driver via Windows Update the moment you uninstall the current one. Disconnecting from the internet during the process can prevent this.
- Black Screen After Reboot: If the Basic Display Driver fails to load, you may need to reseat your HDMI/DisplayPort cable or try a different port on the GPU.
When Should You Uninstall NVIDIA Drivers?
You should uninstall NVIDIA drivers when you’re facing persistent GPU issues such as crashes, performance drops, or driver conflicts after an update. It’s also recommended when switching to a different graphics card or moving between GPU brands (like NVIDIA to AMD). In most cases, a clean uninstall followed by a fresh installation helps resolve deep-rooted driver problems and ensures better system stability.
FAQs
Open Device Manager (press Win + X and choose Device Manager). > Expand Display adapters, right‑click your NVIDIA GPU, and select Uninstall device. > Check the box that says “Delete the driver software for this device,” then restart the PC. For a deeper clean, you can also use Display Driver Uninstaller (DDU) in Safe Mode to remove all leftover files.
Yes, you can delete old NVIDIA drivers. You don’t need to keep multiple old versions on your PC. > Use Device Manager or DDU to uninstall the old driver versions. > After a clean install, You can delete the C:\NVIDIA folder as it typically contains temporary installer files, but it’s optional.
To remove the NVIDIA app on your PC, go to the apps list. > Open Settings → Apps → Installed apps (or Control Panel → Programs and Features). > Find NVIDIA App (or GeForce Experience on older systems) then click Uninstall and follow the steps. > After uninstalling, you can optionally delete any leftover NVIDIA App folders in C:\Program Files\NVIDIA Corporation\NVIDIA app or in your user AppData folder.
Yes, it is okay to uninstall NVIDIA drivers if you plan to reinstall them or switch GPUs. > Without a driver, Windows will use a basic display driver, so your screen may look worse or have a lower resolution. > This is safe to do when troubleshooting issues or updating, as long as you install a fresh, compatible driver afterward.